Arduino Yun - Upload And Debug Yun Over Wifi

by Visual Micro 12. January 2014 17:40

ESP8266 - December 2016 - WiFi debug beta for the esp8266 has been released. Update of variables during debug session is not yet supported. Debug with the esp8266 is easier than with the Yun so please ignore this page and follow the standard visual micro serial debug guide inconjuntion with OTA/IpAddress upload. More docs to follow on the esp8266 page.

NEW USERS PLEASE NOTE: The Arduino Yun only has 4k of free memory when the Arduino networking library called Bridge is included in a sketch. If you are using the network capabilities of the Yun within your sketch then debug using network makes sense. If you are not using the network capabilities of the Yun within your sketch then debug over network is not a practical solution in which case you should use serial usb or SoftwareSerial etc. We recommend that new Arduino users should learn how to upload using serial usb before using the network features of the Yun

Download the first debugger release for Yun networking

This document is draft and will become a summary of tips to make wifi debugging with the Arduino Yun easier.

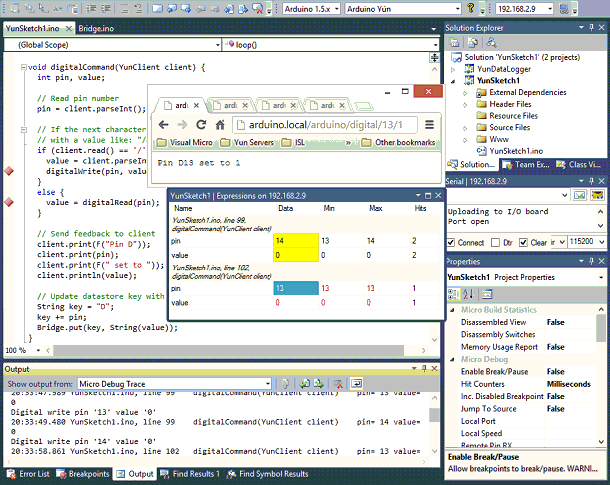
It is possible to upload and/or debug the Arduino Yun by selecting the hostname/ip address of the Yun from the ports list and clicking Debug>Start (little green arrow on the toolbar).

Tip: Visual Micro shows a combined list of Serial port and Arduino hosts in the post list. The upload port is set via the tool bar or Tools>Visual Micro menu.

Any port can be monitored in terminal by either viewing the upload port terninal using the icon/menu or by using the "tools>visual micro>other serial ports" menu item.

Network ports will only be discovered by Visual Micro if Apple Bonjour Service for Windows is installed on the computer.

Network upload is slow compared to normal serial (or programmer) upload. For this reason, where possible we recommend upload using usb, debugging can still be network which is fast (unlike upload)...

For debugging with the Yun you have the usual options of serial or softwareSerial etc. and also the option to use network/wifi

If uploading using network then the default debugger transport will automatically use the network. If upload using Serial/Usb then debugging will automatically use Serial/Usb. The defaults can be overridden in the project proeprties in the same way that SoftwareSerial can optionally be used for debugging (read on).

Network debugging uses the Arduino Console/Bridge library. For network debugging in the beta, the Arduino Bridge or Console libraries MUST have been imported into the current sketch otherwise debug compile will fail. We suggest new users start with the "Bridge" sketch found in the examples explorer (yellow ? on the toolbar)

To upload using Serial/Usb and debug using network, set the following project properties. (tip: project properties appear when selecting the project name in the solution explorer and clicking View>Properties window or when clicking the Yellow question mark icon on the tool bar)

  • LocalPort = Ip address of the Yun (see the ports list to find the address)
  • RemotePort = Console
  • RemoteTransport = Bridge

Notes

In our limited tests the debugger appears to work well over the network we will appreciate hearing feedback in the forum 

The www folder below the current sketch is automatically uploaded during a networked program upload. The www files can also be uploaded manually using the menu "Project>Publish sketch www files"


Arduino Code Snippets

by Visual Micro 2. June 2013 18:14

Visual Studio has a powerful snippet and macro system but the VisualAssistX snippet manager in Atmel Studio is just awsome!

Extracted from http://www.wholetomato.com/products/features/vasnippets.asp

Introduction to VA Snippets

VA Snippets are reusable code templates that allow you to quickly insert commonly used code fragments or to surround selected portion of code in the text editor. Used code templates may contain placeholders replaced dynamically, when the snippet is applied, by the meaningful blocks of code. VA Snippets are easy to create, simple to use and allow you to apply extra parameters taken from the context of the surrounding code, from environment variable or simply from your input.

The main advantage of VA Snippets is that they can be modified easily (no XML) to satisfy current needs and used immediately after modifications. Also by modification of specialised VA Snippets you can change behavior of each refactoring and code autocompletion related feature of Visual Assist.

Snippet definition in VA Snippet Editor:
Snippet applied in text editor:


Groups of snippets

VA Snippets can be divided into following groups:
Note: one snippet may appear in multiple groups if it meets the requirements of the each individual group.


  • Snippets using clipboard- Snippets with $clipboard$
    Includes snippets, where $clipboard$ placeholder is used within the body of the snippet definition.
    During applying of these snippets, a text contained in the clipboard is used as a source for the replacement of the$clipboard$ placeholders.
    User can define new such snippets.


  • Snippets for Surround With - Snippets with $selected$
    Includes snippets, where $selected$ placeholder is used within the body of the snippet definition.
    During applying of these snippets, the current selection in the text editor is used as a source for the replacement of the$selected$ placeholders.
    User can define new such snippets.


  • Snippets for Suggestion Lists - Snippets with shortcut
    Includes all snippets with the assigned shortcut.
    Their entries appear in suggestions list when you type their shortcuts in text editor.
    The result is inserted (replaces a written shortcut) after user’s confirmation of the selected snippet entry by pressing Tab orEnter key on keyboard.
    User can define new such snippets.


  • Refactoring snippets
    Specialized snippets used by Visual Assist X for refactoring purposes.
    Code templates contain context and refactoring operation specific placeholders.
    Titles of these snippets always begin with word Refactor.
    User can customize, but cannot create new such snippets.


  • Smart Suggestions
    Highly context-aware code hints suggesting text you're likely to type in the current context.
    With Smart Suggestions, C++ users enjoy C#-like autocompletion for several common scenarios.
    Code of snippets contains lines, where each line of code means one entry in suggestions lists.
    Each of these lines represents individual code template, so you can use expandable placeholders in their definitions.
    User can edit all such snippets, but can create only those for datatypes, so can not create context related.
    Title of these snippets must begin with keyword SuggestionsForType.


Supported placeholders

Placeholders in VA Snippets are keywords to be replaced by meaningful code enclosed by markers. There are two main types of placeholders - those enclosed in dollar '$' signs and Environment Variables enclosed in percent '%' signs.  Remember, that those enclosed in dollar signs are case-sensitive and Environment variables are case-insensiteve, so take care of it during editing or creating snippets.

Supported placeholders are:

  • Reserved Strings
    Predefined placeholders maitained by Visual Assist, their name is enclosed in $ signs.
    User can affect their content only by current IDE settings, project properties, system settings or by positioning caret to specific code context.
    For example, $clipboard$ will always expand to the content of clipboard, $DATE$ will always expand to current system date and so on.
    This group also inlcudes special placeholders usable only within Refactoring snippets.
    Click here to see the complete list of reserved strings with their meaning
  • User Prompts
    User-defined placeholders placed by enclosing meaningful keyword in $ signs.
    To work properly, used keyword must be equal to all its references within snippet definition, and must not be included inReserved strings.  
    During applying process of snippets containing such placeholders, user is prompted for actual values to be used as a result of their expansion.
    The maximum number of user prompts within one snippet is limited to eight.
    Click here for more info about User prompts in VA snippets.
  • Environment Variables 
    In VA Snippets, environment variables are placed as their names enclosed in % signs.
    Unlike other placeholders are case-insensitive, and are expanded before applying of another types of placeholders.
    That enables also a usage of environment variables as a default values in the user defined placeholders.
    Click here for more info about Environment Variables in VA snippets.


First touch - "for" loop

To try how to use VA Snippets to place a “for" loop do following:

  • Ensure that you have opened a C/C++ or a C# project.
  • Place the caret in the text editor to position, where you want to insert a new “for" loop.


  • From IDE’s main menu choose VAssistX -> Insert VA Snippet...


  • In appeared menu choose VA Snippets with shortcuts and then select entry “for loop forward”.

  • Dialog with two input boxes opens:
    The input box labeled “Index” asks for a name of the index variable for the scope, usually programmers use “i”.
    The input box labeled “Length” asks for a number of iterations, so insert for example 100.


  • Click on OK button or press Enter key on keyboard to confirm.
    This is the result:


Now you are ready to insert a “for" loop in simpler way - using shortcut.

  • Move the caret to the position, where you want to insert another “for" loop.
  • In the text editor write “forr” (double “r”) - the shortcut of the predefined For loop snippets.
  • In the suggestion list (which is a Visual Assists’s replacement of intellisense in Visual Studio)
    you should see entries: For loop forwardFor loop reverse and perhaps some other suggestions.
  • Select entry For loop reverse and confirm by pressing Tab or Enter key.


  • Similar dialog as in previous case opens, so insert “i” for index and 100 for length.

  • Click on OK button or press Enter key on keyboard to confirm.
    Follows both results together (current on bottom):