Arduino Custom Build Events and Hooks

by Visual Micro 20. March 2017 04:37

Arduino supports many different build events. Visual Micro supports the same events and more. If you can't find an event that meets your needs then please make a request to our forum. Build events are normally placed in the arduino platform.txt system which can be quite convoluted and difficult to test. Licensed users of Visual Micro can opt to use  local project board.txt instead of the usual Arduino locations. The advantage is easier development and testing along with events that are specific to a single project. When making changes to a local board.txt click the "Save" button pior to testing a new build.

The full Arduino build specification is listed here. Visual Micro also provides the following additionl events:-

  • Pre upload event
  • Error during upload event
  • Post upload event (only executes if no error was encountered)

Paste the following into a board.txt to see an attempt to run events. Obviously the example will produce an error because the .bat file will be missing but you will see how it works :)

# before upload event - example

recipe.hooks.deploy.preupload.pattern=cmd.exe /c "c:\hooks_test\test_pre.bat" "{build.path}"  "{build.project_name}" "{build.project_path}"

# upload failed event - example

recipe.hooks.deploy.errorupload.pattern=cmd.exe /c "c:\hooks_test\test_error.bat" "{build.path}"  "{build.project_name}" "{build.project_path}"

# upload complete event - example

recipe.hooks.deploy.postupload.pattern=cmd.exe /c "c:\hooks_test\test_post.bat" "{build.path}"  "{build.project_name}" "{build.project_path}"

Arduino Shared Cross-Platform Code And Library Development

by Visual Micro 16. January 2017 14:09

news: april 2017 - this functionality is free and in all version from vs2015+

related: shared single code files between projects

Visual Micro makes special use of Visual Studio C++ Shared Projects for both project and library development. C++ shared projects were released in Visual Studio 2015 and are improved in the soon to be released Visual Studio 2017.

Use "File>New>Project>C++>Arduino Library Project" to create a new library project or the "Add Library" menu to create from existing library code. When creating a project from existing library code, the code remains unchanged and compatible with the Arduino IDE. 

There are two types of shared projects that Visual Micro supports. It is important to understand the difference. Shared "library" projects that contain an Arduino format library.properties text file in the project root are compiled as Arduino Libraries. Shared "code" projects do not contain a library.properties text file. During compilation of shared code projects, the code is merged with the main project code in the temp build folder. In this case the code can be accessed as if it was within the folder structure of the main project.

Multiple main projects can use the same shared project(s). Intellisense in shared projects is powered by the current "Startup Project". A shared project can not be compiled directly, can not be a Startup Project and does not have a fixed platform.

tip: Adding a new library project to an official Arduino library folder will automatically make the library available for use in the Arduino IDE.

Shared projects can be created using the standard Visual Studio new project wizard.

Visual Micro also provides a simple way to create a shared project for an existing Arduino library.

Shared projects that contain an Arduino library.properties in the root folder are considered to be Arduino Libraries. If the library.properties file does not exist the shared project is considered part of the main project.

The "References" node of a Visual Studio project enables shared projects to be referenced by a master project.

Some of the magic of shared projects is that they do not have a specific architecture. Instead the architecture (intellisense etc) is taken from the "Startup project" of the current Visual Studio solution.

This enables us to develop cross-platform code whilst benefiting from intellisense for a specifc architecture. in fact VS2017RC takes this a step further but that's for another blog.

Using a shared library project is no different to using normal Arduino libraries. In fact they are normal arduino libraries except they also have a .vcxitems file in the library root which simply allows Visual Studio to show the source code during development (in a solution).

Shared library projects must be #included in the code in the same way as a normal Arduino library. The fact that we are using a shared project for development has no bearing on the compilation. The compliation works as normal and compiles the library as it does for all other libraries.

A useful difference between a shared library project and a normal library is that Visual Micro can find the library in any location, not just the published known Arduino library locations. This has many benefits for source control and also versioning.

It is possible to create a shared library project and add it to a solution with a single click.

All users must add a reference to the shared project to the master project(s). Right click the "References" node of a master project in the solution explorer to add the reference to the Shared Project (library). This ensure the intellisense of the shared project will know the correct architecture.

Below are the images of the steps for paid Visual Micro users:-

1) Paid users should switch on "Create a project when adding libraries


2) Add a library to a project in the usual manner.

If the project already uses the library it will not cause an issue. If the lib headers are not required in the .ino file you can remove them.

3) After adding a library, the headers will be inserted into the .ino code as usual. In addition, a new project (with the same name of the library) will be added to the currently open solution (if the library project does not already exists in the solution)

So that intellisense can detect the correct platform, a reference is added to all master projects in the solution that use the library.

Right click the References node of a master project and then click "Add Reference"

4) When the Add Reference window opens, cick the "Shared Projects" tab and put a check mark against the library project(s) you want to use in the current master project.


How to override the Arduino build or upload events

by Visual Micro 5. February 2014 14:08

Visual Micro uses the flexible build configuration system process of the Arduino Ide and also supports the extensions of Teensy and some other hardware manufacturers.

Teensy Example #1 - Extend the upload process

The boards.txt that is installed under the teensyIde/hardware/ avr or teensy folders contains a list of boards. You can copy these entries enaming the first part of each board property. For example Teensy3.name= becomes MyTeensy3.name

Each board entry defines the uploader exe name. The uploader exe is passed a few paramaters such as com port mcu etc. as normal program args[]

So it is easy to set the upload to use a different uploader program which might first call the "real upload" and then can then run any windows program as required or show it's own form/user controls. 

Teensy Example #2 - Replace the standard process

Instead of adding a custom boards.txt entry the existing compile or upload command supplied with the Arduino Ide can be renamed and a small windows program can be used in its place. The windows program can call the renamed original first, causing compile or upload to occurr prior to performing other tasks or launching another program.

Manual Controls

It is also possible to add your own short cuts and menu items to Visual Studio that run macros or programs. You can also register external tools.

Debugger Extensions

The Visual Micro debugger is the first component in Visual Micro that supports open source extensions. You can read more about adding your own C# or VB graphical extensions in the wiki

Avr Programmers (and others) Usb Driver for Arduino

by Visual Micro 17. January 2014 09:21

This document solves usb driver errors for Arduino programmers. The problem usually happens after installing Atmel Studio. The error will often be:- avrdude: usbdev_open()

Atmel changed the usb driver they install to Jungo which doesn't work with the Arduino Ide and therfore with Visual Micro

This document explains how to switch the driver to one that the Arduino tool chain will work with.

Tested on Xp, Win7 and Win8.1

1) We downloaded the latest release (1.2.6.0) of libusb-win32 from http://sourceforge.net/projects/libusb-win32/files/libusb-win32-releases/ but the latest release can be found here http://sourceforge.net/projects/libusb-win32/

2) Unpack the libusb zip and run the inf-wizard.exe in the bin folder AS ADMINISTRATOR

3) Select the avrisp mkII from the list that appears when you run inf-wizard then click next through the wizard.

4) When prompted select a place on your pc to save the .inf file that the wizard will create. (If you loose the file in the future you can simply repeat the task)

5) When prompted click OK to install the driver.

If required you can run the Atmel Studio 6.1 Jungo driver install again and revert to Atmel Studio drivers with the avrispmkII. 

It is probably also possible to switch back to arduino/avrdude mode by reapplying the .inf created in step 6) via device manager

Sorry about the formatting of the following, it is my fault and caused by conversion from ms word. This update was submiited by Brian M. It explains how to make both the Arduino and Atmel Studio Native commands to work using the same usb driver

Using Atmel's AVRISP mk II Programmer

 with the Visual Micro plug-in for Atmel Studio IDE 

Overview:  When you install the Arduino IDE, a USB driver is installed so that you can use the Atmel AVRISP mk II programmer as an alternative to using the Arduino serial Boot-loader. Also, if you need to actually program an AVR MCU with the bootloader code itself (i.e. if you have a blank Mega328 that has not had the boot-loader firmware pre-installed), you can do so from the Arduino IDE using the Tools/Burn Bootloader function- after having specified the AVRISP mk II as the programmer using Tools/Programmer function.

            When you install Studio 6.1/ 6.2 however, the Atmel installation will install it's own USB driver, which work with the Studio6.x IDE. This is the Jungo driver, and while you have the option of not installing the Jungo driver during the Studio install process, you can't use the Atmel AVRISP mk II nor the Atmel JTAGICE3 without this driver.


The Problem: When you install the Visual Micro plug-in for Studio 6.x, you are most likely to be using the Arduino serial bootloader, since Visual Micro's programming and  debugging capability is based upon the USB-serial link between the PC and the Arduino board. Doing things  this way works fine.

            However, if you decide that you want to use the Atmel AVRISP mk II from within the Visual Micro/Studio 6.x IDE (for downloading your program, or burning the Arduino bootloader), you will find that it doesn't work. You will get an error message to the effect that AVRdude (the programming software used by the Arduino IDE), can't “see” the AVRISP mk II programmer. This happens because Studio6.x uses the Jungo USB driver, and Visual

Micro basically calls the AVRdude programming software (located in the Arduino program folder) just like the Arduino IDE does. AVRdude won't work properly, because its normal USB driver has been replaced by the Jungo driver that Studio6.x has loaded.


The Solution:  What we need is a way to allow the Jungo driver that is associated with the Studio6.x to co-exist with the USB driver that the Arduino IDE uses. That is, we want the Arduino programming routines (i.e. the AVRdude program) to work even with the Atmel Studio6x Jungo driver loaded. This is not too difficult to achieve.

1)   If you want to be certain that Studio6.x has installed the Jungo driver, you can run the Windows Device Manager program, and you will see the following (assuming your AVRISP mk II is plugged in)


2)    The USB driver that the Arduino IDE uses (and therefore Visual Micro) is libusb0.dll. This DLL comes from a larger driver package that installs a basically generic USB driver (which can be used by a variety of Windows applications). This package provides drivers in two formats: stand-alone and filter. The stand-alone format is what the Arduino IDE installs when you run the Arduino setup program. It works fine on its own, but doesn't work with native Atmel Studio6.x tools unless using Visual Micro. If the Atmel Studio usb drivers are installed then we can still program Arduino using Visual Micro but not the Arduino IDE. This can be fustrating if we want all software to work all of the time regardless of Visual Micro. The filter version of the driver works differently. It basically interfaces to your application (Arduino IDE in this case) via the libusb0.dll, but the filter version of the DLL then “massages” the data and forwards it along to the Jungo driver (which is what Studio 6.x uses by default).So, after installing this “filter” version, when you use the “upload using programmer” or “Burn bootloader” functions available in the Tools/Visual Micro toolbar, they will work correctly.

3)   You download the libusb package from the sourceforge.net website, by searching for libusb. Pick the libusb-winb32 version. Unzip the downloaded file (libusb-win32-bin-1.2.6.0 when I did it), navigate to the libusb-win32-bin-1.2.6.0/bin folder  and enter  the i86 folder. Plug in your AVRISP mk II now. Then run the install-filter-win program, which will display the following screen:


Press Next, and you should see your Atmel AVRISP mk II in the list:

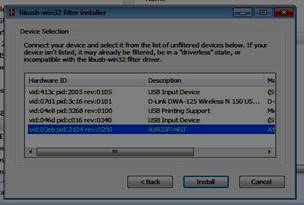
            Select the AVRISP mk II and hit Install.

            If the AVRISP mk II does NOT appear, it is possible that a libusb driver for it has already been installed (and presumably not the filter version, or you would not be having this problem in the first place).You can go back and select the “remove a device filter” option, and if you see the AVRISP mk II in that list, remove it. Then you should be able to re-try the installation of the filter driver for the AVRIPS mk II. If successful, you should get the following message:

4)   You should now have a libusb0.dll filter driver installed for the AVRISP mk II. You can check for its presence in the Windows/System32 folder under the filename libusb0.dll. You can test the driver using the testlibusb program (in the x86 folder mentioned above):


We're almost done. However, we have to stop the AVRdude program (used by Arduino for programming) from using the libusb0.dll file that it has already installed in its own folder, and use the new (filter version) one that we've just installed. Do do this, we have to “remove” all instances of the libusb0.dll file from within the  c:\program files\arduino folder hierarchy.

The best way to do this is to navigate to the  c:\program files\arduino folder, and do a search for “libusb0.dll. Once you have found them, rename them to libusb0.dll.bak (in case something goes wrong and you need them back again!


            In the case of my XP computer, there were 3 files, and on my 32-bit Win7 computer, there was an additional libusb0-x64.dll file (for 64 bit windows). Once these files are “removed” by renaming them, AVRdude will still look for libusb0.dll, but will only find the filter version in the windows\system32 folder, (where all windows programs look, by default, if they can't find the necessary DLL in their own folder).

            At this point you should be able to open the Studio6.x program and go to the Tools/visual Micro/Programmers tab and select the AVRISP mk II. After you click the “upload  using programmer” tab you should now be able to download programs to your AVR target board using the AVRISP mk II programmer, or use the “burn Bootloader” routine in the Tools/Visual Micro menu bar.

NOTE: to use the Visual Micro USB debugging routines, you will still need to connect your Arduino board to the PC using the standard USB connection cable, as fully described in the Visual Micro documentation.

            This procedure worked for me on both my XP and 32-bit Windows 7 computers, one with Studio6.1 and the other with Studio6.2 and the Visual Micro plug-in.


Visual Micro - Links & Reviews

by Visual Micro 1. January 2014 00:00

Read about and review Visual Micro

Visual Studio Gallery

Visual Micro's Page on Arduino.cc


Preparing a project to use the Serial Port in either Release or Debug mode

by Visual Micro 29. August 2013 10:57

This document applies more to boards such as Maple than Arduino but is a useful reference for all

Arduino is quite tollerant but boards such as Maple will crash if we use the SerialUSB.begin() command in our code more than once. Since the debugger, whichever port is it using, issues a SerialUSB.begin() we need our user code to only issue a SerialUSB.begin() when in release mode (non-debug)

The examples below show how to conditionally add code to a project based upon the release/debug (Micro Debug=True) setting using a define called VM_DEBUG.

Another example shown below is the use of a delay when the board first starts. Normally Arduino boards do not need this delay but we found that boards such as maple only work reliably over serial with an initial delay. The debugger automatically enforces this delay so the example shows how to add the delay for normal release mode use of the serial port. The example shows a 2 second delay (2000 milis)

void setup()

{

//     pinMode(BOARD_LED_PIN, OUTPUT);

//if we are not starting in debug mode we can optionally do stuff

//maple gets very upset if both the debugger and user code issue a "begin()" request

//so for maple we let the debugger initialise the port

//for arduino it doesn't matter so much. we can use the project property called RemoteSpeed to force the debugger to use something other than 115200

#if !defined(VM_DEBUG)

//maple uses SerialUSB by default

       SerialUSB.begin();

//for arduino and hardware that requires a baud rate

       //Serial.begin(115200); 

//maple likes this delay for Serial or the first serial messages are lost

       delay(2000);           

//an example

       SerialUSB.println("Starting Maple in release mode");

//for arduino/teensy/msp430

       //Serial.println("Starting Arduino in release mode");

#endif

}

void loop()

{

// Turn the LED from off to on, or on to off   

//toggleLED();          

#if defined(VM_DEBUG)

       SerialUSB.println("Running in debug mode");

#else

       SerialUSB.println("Running in release mode");

#endif

       delay(200);

}

//The example above also demonstrates use of the Visual Micro "Debug Mode" define (VM_DEBUG)

Force clean compile when project defines change

by Visual Micro 22. August 2013 10:30

By default, "project defines" do not normally cause core and libraries to re-compile unless defines that are listed in boards.txt (arduino config file) have changed.

If the automatic re-build detection is not accurate enough for your needs then there are two features that will be useful:-

1) Manual

Clicking "Build>Clean" clears the cache and forces the next compile to be a full compile.

2) Automatic

It is also possible to switch on the these two project properties which will force a re-compile if any of the project defines change.


Code:

Project Defines Affect Core = True
Project Defines Affect Libraries = True

Tags:

General

Differences between Arduino in Visual Studio and Atmel Studio

by Visual Micro 26. May 2013 16:12

This document is designed to be my own personal observations of note worthy functional differences between the development of Arduino programs in Visual Studio and Atmel Studio.

Both Visual Studio and Atmel Studio provide indentical Arduino compile, upload and debugging features.

Visual Studio Pro has more features for advanced users and if you already own a copy of Visual Studio it would be prefered.

Visual Studio 2008 and 2013 both open quickly and provide high speed intellisense (not perfect but good)

The plugin for Atmel Studio is currently lacking a few minor features such as "project>show all arduino files". This feature is very useful for explore library sources within the project and also aids the class explorers.

Atmel Studio lacks some of the customization features of Visual Studio such as macros.

Visual Studio "disables" source code based on #defined conditions, this is very useful but can also be fustrating because it also disabled intellisense within the disabled code. Atmel Studio does not do this.

Visual Studio intellisense code suggestions are more accurate. Example: you will see Serial,Serial1 etc for mega 2560 and just "Serial" for Uno, Atmel will show Serial,serial1 etc for all boards.

Atmel Studio has the simulator and various other tools.

Visual Studio intellisense understands only C++, Atmel Studio is naturally aware of the micro-controllers native language.

Visual Studio provides web authoring tools within an Arduino sketch project for web based boards such as the Yun (both Ide's support web/network compile and upload). Visual Studio Express or other web design tool can be used so this is not a huge weakness for Atmel Studio.

Atmel Studio is knows about its own micro-controllers and might have a brighter future than Visual Studio for Visual Micro

Visual Studio is required for other "non-atmel" architecures such as Energia and Chipkit

A guide to installing new non-arduino hardware or custom arduino cores

by Visual Micro 22. September 2012 17:35

A guide to installing new non-arduino hardware or custom arduino cores

...


Arduino allows new non-arduino hardware to be installed to the arduino ex folder or to the arduino sketchbook folder.

Adding new hardware cores and libraries to your "Sketch Book Folder" is probably the best way to work because it means that you don't have to re-install the new hardware each time you upgrade to a new Arduino IDE.

For the purposes of this demonstration we are using "avr-netino". The image below shows a successful compile of the 4 example projects in the avr-netino-19Jan2012.zip on google code.

I am currently running Visual Studio and arduino 1.0.1, but I think it will work the same for arduino 1.0. 

These are the steps I made to install this new hardware and associated files.

Overview

The zip contains 3 folders. Hardware, Libraries and Examples

Installation

1) Copy the contents of the "Hardware" folder to your "[Sketch Book Folder]\Hardware" folder. 
Nb: Create the Hardware folder if it does not exist

2) Copy the contents of the "Libraries" folder to "[Sketch Book Folder]\Libraries"
Nb: Create the Libraries folder if it does not exist.

3) Copy the "avr-netino" folder from the "examples" in the zip to the sketch book folder.

The location of your sketch book folder can be found in the Arduino ide "File>Preferences" window or by selecting "File>Open Arduino File" in Visual Studio. My sketch book folder is "My Documents\Arduino"

Re-start Visual Studio and you should see the new hardware on the boards list. Both Visual Studio and Arduino should compile correctly with this configuration.

In what order does Arduino combine sketch files (pde/ino) during compilation?

by Visual Micro 18. July 2012 08:32

During compilation Arduino sorts (sequences) the sketch files as follows:-

  1. Main sketch file is always first
  2. Followed by sort based on alpha char codes

This is a correct example for sketch 'MySketch.ino' :-

  1. MySketch.ino
  2. AFile1.ino
  3. BFile2.ino
  4. aFile3.ino
  5. bFile4.ini

The release of visual micro due end of july 2012 applies the above order. Previously releases always ensured the man sketch was first but then incorrectly applied a standard alpha sort which resulted in an incorrect sequence as shown below:-

  1. MySketch.ino
  2. AFile1.ino
  3. aFile2.ino
  4. BFile3.ino
  5. bFile4.ini

Arduino avrdude upload error common causes

by Visual Micro 2. June 2012 14:58

Generally there are only a few reasons for avrdude upload errors during arduino serial/bootloader uploads:-

  • The wrong serial port is selected. Answer - Select the correct serial port from the serial ports list
  • The wrong Arduino board is selected. Answer - Select the correct board from the Arduino boards list
  • Tools>Upload using Programmer is incorrectly ticked. Answer - Untick the menu item

Arduino Upload Error Example

Uploading to I/O board using 'COM37'

avrdude: Version 5.11, compiled on Sep 2 2011 at 19:38:36

Copyright (c) 2000-2005 Brian Dean, http://www.bdmicro.com/

Copyright (c) 2007-2009 Joerg Wunsch

[more detail...]

How to - Arduino code syntax in c++ (.c. cpp .h)?

by Visual Micro 1. June 2012 15:59

We often want to structure the code in our Arduino projects to keep it simple and organised. The Arduino system allows us to create two main types of source files. The first type of source file are the "standard" Arduino source files. These standard files have a .pde or .ino extension and are, behind the scenes, automatically combined into a single file during program compilation. This provides some advantages in terms of simplicity but is not as flexible as using standard C/C++ soure files.

The second type of file are normal C++ files. In Visual Studio it is possible to add C++ files to Arduino projects using the built in menu commands or the additional Arduino "quick insert" commands shown on the "Add New Item" button on the toolbar. The quick insert creates either a .c or a .cpp files and a .h file.

When c++ files are used in an Arduino project the Arduino core is not automatically available to the source code, as it is with .pde/ino files. However, the Arduino core can be included in various ways one of which is described below:-

If you look in "[arduinoide folder]/hardware/arduino/cores/arduino" you will see the arduino core files for include ideas such as hardwareserial.h, string.h or avr/pgmspace.h. HardwareSerial.h provides access to the Arduino serial commands that are normally available in a .pde or ino files.

In Arduino IDE version 1.0 and above the main Arduino program include is "Arduino.h", in older versions it is "WProgram.h". If required we can use the automatically defined ARDUINO constant to check for and use the correct include based on the current Arduino IDE version.

The following code example is how to include the correct Arduino core header and also to provide access to Arduino Serial functions from mycode.cpp and mycode.h files:-

mycode.c or mycode.cpp:-

#if defined(ARDUINO) && (ARDUINO >= 100)
#include "Arduino.h"
#else
#include "WProgram.h"
#endif
#include "HardwareSerial.h"
#include "myc.h"

mycode.h:-

#if defined(ARDUINO) && ARDUINO >= 100
#include "Arduino.h"
#else
#include "WProgram.h"
#endif
#include "HardwareSerial.h"
#include "myc.h"

Tip: All arduino versions 1.0 and above have a version greater than or equal to 100

Reference Arduino In .cpp and .h Source Code

by Visual Micro 1. June 2012 12:00

When C++ files are used in an Arduino project the Arduino core is not automatically available to the source code, as it is with .pde/ino files. This document describes how to include the Arduino core manually in c++ files.

The following code example is how to include the correct Arduino core header and also to provide access to Arduino Serial functions from mycode.cpp and mycode.h files:-

mycode.c or mycode.cpp:-

#if defined(ARDUINO) && (ARDUINO >= 100)
#include "Arduino.h"
#else
#include "WProgram.h"
#endif
#include "HardwareSerial.h"
#include "myc.h"

mycode.h:-

#if defined(ARDUINO) && ARDUINO >= 100
#include "Arduino.h"
#else
#include "WProgram.h"
#endif
#include "HardwareSerial.h"
#include "myc.h"

Tip: All arduino versions 1.0 and above have a version >= 100. Example: Arduino 1.0.1 has a version of 101.

Tags:

General

Use Visual Assist X to refractor Arduino source code

by Visual Micro 7. February 2012 12:00

Visual Assist X by "Whole Tomatoe Software" is, amonst other things, a very good refractoring and code highlite tool.
 
I would not normally suggest an addin for Visual Studio, let alone one you pay for, because they all slow things down. However the Visual Assist X (VAX) tool is so well used and well written that it is worth trying it out.
Below you will find a brief overview of the VAX tool along with instructions about how to configure arduino .pde and .ino files as c++ files in VAX

Develop new code faster with fewer errors

Read code faster than ever with fewer errors with enhanced syntax coloring. Write code at blinding speeds with Suggestions, Acronyms and Snippets. Identify and correct errors before compiling.

Quickly understand existing code

Enhanced IntelliSense and enhanced completion listboxes help to shed light on unfamiliar classes and members. Get detailed information on current symbols and quick shots of info by looking at small context and definition fields.

Refactor existing code making it easier to read and cheaper to maintain

Visual Assist X offers fast and easy refactoring across ALL languages in your solution with its suggested refactoring and code outline view. "I have to say that I like this feature the most. Highlite a chunk of code and have a method automatically created for you! A great way to re-structure code."

How to configure VAX to recognise .pde or .ino source files as c++ files

You have two options... 

If you have already setup visual studio color coding (as per Visual Micros Arduino guide) then you might only need to follow the instructions below. Otherwise follow the official whole tomatoe C/C++ setup guide. You need to configure for both .pde and .ino Arduino file extensions
Add ".pde;.ino;" to ExtSource in the following location
HKEY_CURRENT_USER\Software\Whole Tomato\Visual Assist X\VANet8

Press Rebuild on the Performance tab of the Visual Assist X options dialog and restart your IDE

NOTE:-
Replace 8.0 with 10.0 if you use VS 2010.
Replace 8.0 with 9.0 if you use VS 2008.
Replace 8.0 with 7.1 if you use VS.NET 2003.
Replace 8.0 with 7.0 if you use VS.NET 2002.

Replace VANet8 with VANet10 for Visual Studio 2010.
Replace VANet8 with VSNet9 if you use VS2008.
Replace VANet8 with VSNet if you use VS.NET 2003.
Replace VANet8 with VANet7.0 if you use VS.NET 2002

Arduino Visual Studio Examples and Images

by Visual Micro 5. October 2011 14:42

The Visual Studio>Tools>Serial Ports menu will automatically enable and disable when arduino boards or xbees are connected. We can override arduino programmer settings from within visual studio

Arduino Visual Studio Tools Menu

The Visual Studio "Tools" menu example below is taken from a machine that did not have a connected serial port.

Various arduino command are added to visual studio in all relevent positions such as the Standard Tool Bar shown below

Arduino Visual Studio Create New Arduino Project Using the Visual Studio Standard Tool Bar

The Visual Studio Tools menu allows an arduino board to be selected for a visual studio project as does the boards list on the tool bar

Arduino intellisense in Visual Studio is fully available and automatically built from any arduino sketch

Arduino Visual Studio Intellisense for the Selected Arduino Board

Multiple sketch projects in a single solution are fully supported. F5 will compile and upload the Visual Studio "Start Up" project. Board and Serial port can be selected for each sketch project.

Arduino Visual Studio Multiple Sketch Projects in a Single Visual Studio Solution

Ultra fast intelligent visual studio arduino compiler

Arduino visual studio ultra fast arduino compiler


Unlimited serial viewers in Visual Studio auto pause and re-start during upload to an arduino board. All arduino and user conditional compiler directives are fully visible as you code

Unlimited serial viewers in Visual Studio auto pause and re-start during upload to an arduino board. All arduino and user conditional compiler directives are fully visible as you code


The Visual Studio "project" menu contains a number of arduino commands related to the active project, some of which are shown below

 "Show all arduino files" is for advanced users who would like the arduino core and "selected libraries" source codes included in the Visual Studio solution

The Visual Studio Project menu contains a number of Arduino commands related to the active Project

 Visual Studio has serial tool windows for arduino or any other project

 Visual Studio has serial tool windows for arduino or any other project

Arduino for Visual Studio - Release Notes

by Visual Micro 26. September 2011 07:40

26 September 2011 - Finishing the user interface with a view to preventing the addin from cluttering the already busy visual studio interface. This means integrating our menu items into the standard Visual Studio menus.

For example:- File.Open,File.Add,Toolbar.Add New Item,Toolbar.Add New Project,Project.Add New Arduino Item,Project.Add Arduino Library,Project.Set Board,Project.Set Upload Using,Build.Project,Build.Solution,Debug.Start,ProjectExplorer...,SolutionExplorer...

The next version is a complete rewrite offering at least the same functionality offered by the Arduino development tool. The final work is to ensure that we are also Arduino1 compatible which includes support for the new Arduino file extensions.

We now use standard visual studio commands such as F5 build and upload, double click goto error, simpler setup .The intellisense is complete and the compile/upload works fully. We can even burn new bootladers. Support for single or multiple solutions containing single or multiple sketches is included as standard. There is also a new api allowing arduino plugins to be created for other development systems.

The new version will be released over the next week. Please register in the forum if you would like to be notified when new versions are published.

Version 2 Preview - Complete Clone of Arduino ++. Multi sketch, multi serial, high speed compile, full intellisense, simpler setup

NB: Initially for VS2010. A VS2008 version will also soon be released. Visual Studio Express is not supported

Arduino Code Object and Class Browser

by Visual Micro 2. May 2010 14:17

The visual studio object browser simplifies browsing of arduino/wiring libraries, custom libraries and your own code.


Navigating the Navigator. ArduPilot in Visual Studio 2010

by Visual Micro 2. May 2010 13:31

Editing any of the ardupilot versions using visual studio 2010 really shows off the quality of the ardupilot code. I love people who comment their code. Very neat!

And look how easy arduino project "navigation" is in Visual Studio, you can "Go To" the right place in the code.

I didn't know where the stabilize() function was but visual studio "Go To Definition" took me right to the attitude.pde. The intellisense in visual studio works best with well stuctured programs such as ArduPilot!

You need Visual Micro to make this work easily in 2010. It is free and quite new so the help system is a little confusing. Feel free to grab a copy.

The ardupilot code can't yet be compiled in visual studio due to the complex interaction between the multiple .pde files. However, Visual Micro adds a menu item to visual studio called "Open project in Arduino".which allows you to easily jump into the Arduino IDE to compile your mods. The next release of Visual Micro will allow compile and upload from within visual studio

What does it mean when Visual Studio disables an addin

by Visual Micro 11. April 2010 18:56

If Visual Studio 2005/2008 encounters a problem with an addin it will disable it by altering the addin xml.

To enable the addin again ensure the addin xml is in the "\document\visual studio x\addin\" folder, as per the installtion guide, and ensure the following settings are in the .addin xml

 <LoadBehavior>5</LoadBehavior>

<CommandPreload>1</CommandPreload>

<CommandLineSafe>1</CommandLineSafe>

"One Click" add new source and header file(s)

by Visual Micro 11. April 2010 13:57

In the lestest product version the following functionality has been moved to the standard visual studio menus such as File>New or right mouse click project "New"

The "New" menu contains two very useful options enabling new files to be quickly added to an arduino visual studio project . This is a useful features if you often need to add a new .c and .h files to your projects.

note: To add files to your arduino projects in visual studio you can always use the standard visual studio "add file" or "add existing file" options.

Workflow Objective

Create a new .c file named MySubFile.c to the project (if it does not already exist) folder and link it to the project "Source Files" filter

Create a new .h file named MySubFile.h to the project folder (if it does not already exist) and link it to the project "Header Files" filter

Insert an #Include for MySubFile.h to the currently active source file (or .pde)

Open the new files for editing

How To

1. Choose to add .c/.h or .cpp/.h

2. Provide a name for the new files

3. Visual Micro does the rest!