Debugging Tutorial Part 1: What Breakpoints Are Good For
If Visual Micro is not working as described here,
then you might have changed a setting from its default state.
In this case go to this page and modify the settings marked with the  icon.
icon.
The first page of this tutorial shows you how to setup the training sketch and the required
settings for Visual Micro.
The BlinkWithoutDelay example lets the LED on the board blink,
without using the delay() function.
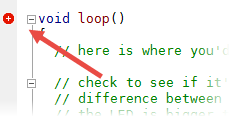
You will notice a
demo breakpoint at the start of the loop()
function. It is the red dot besides the code line. Visual Micro
tutorial mode -which we have enabled earlier- has set this breakpoint
automatically for you.
You will notice that our LED is not blinking. This is because your
sketch is stopped in the demo breakpoint at the start of the loop() function.
You can see this in the Output Window (if needed make it visible with
View > Output):
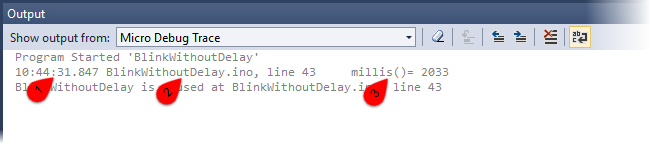
1
This is the exact time when the breakpoint was hit
2
These are the source file and line number, where the breakpoint is located
3
This shows the actual value of a variable or function, in this case 'millis()'.
This is how the demo breakpoint is configured. Later you will see, how you can
configure breakpoints to show the values of the variables you need
You can continue the sketch by pressing [F5]. Since the breakpoint
is in the loop() function, and loop()
is called over and over again, your code will immediately stop at the next entry
of loop(), which means: immediately.
This shows you some obvious benefits of breakpoints:
- If you set multiple breakpoints in your code, you can see which
parts of your code are executed in which order when it passes these
breakpoints, and if they were executed
at all.
- As long as the code is halted, you can make checks with your hardware,
e.g. measure voltages calmly, without the code changing theses voltages all
the time.
Setting and deleting breakpoints
Breakpoints are "invisible" parts of your code.
Whenever you change something to a breakpoint, you must rebuild your
sketch and upload it again, to make the change effective.
Now let's try to set a breakpoint elsewhere. We first want to get rid of the demo
breakpoint. Simply put the cursor in the line with the breakpoint and press [F9].
The [F9] key toggles between breakpoint set or not set on that line.
- Press [F9] to remove the breakpoint
The board is still halted in the demo breakpoint, even though you have
deleted it on your PC - it is still existing on your board. Therefore, we must
stop the sketch and upload it again.
- Disconnect Visual Micro from your board
by clicking on the "Stop" button
 on the toolbar
- Move the cursor to the line "previousMillis = currentMillis;"
and press [F9] to set a new breakpoint. The red appears
to indicate the breakpoint.
- Press [F5] or the
 toolbar
button to build and upload again
toolbar
button to build and upload again
Now you will see that the sketch stops at the line where you have set the
new breakpoint. With every [F5], the sketch continues and runs
until it stops in the breakpoint again. This time, the LED changes between on to
off with every [F5].
At this point, you can start to play around with breakpoints yourself, if you
like. Please note that there are certain places in code, where breakpoints
cannot be set (Details here), but these are
minor limitations.
You can now continue with part 2 of the tutorial:
2. Breakpoints that don't stop
the sketch