Debugging Tutorial - Part 2: Breakpoints That Don't Stop
the Sketch
It is not always intended that breakpoints stop your sketch. You may want your
sketch to run uninterrupted, but still want to see where your code passes
by. That's when tracepoints can be used. Tracepoints are
like breakpoints, but they do not stop the sketch execution.
How to set tracepoints
The easiest way to create tracepoints instead of breakpoints is to switch to "Debug Trace" mode.
- Set the checkmark next to the menu item
vMicro > Debug Trace Only
This setting controls all breakpoints, new or existing, and all projects, so this is the
best way if you prefer tracepoints generally.
After changing this setting, you must rebuild and upload your sketch again
with the  toolbar button or vMicro > Build & Upload.
This is how the Output Window looks like if you are working in Debug Trace
mode:
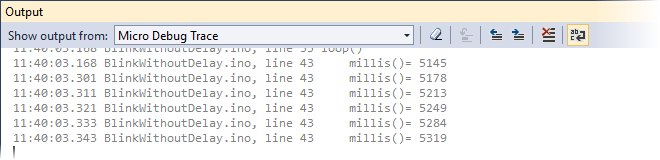
From the timestamp at the start of each line, you can see that every loop
takes about 10 milliseconds. However, measuring times with tracepoints is not
very accurate when it comes to small fractions of time, because the tracepoints
themselves need a few milliseconds to send their data to your PC (read
more), and there's a built-in limit that makes sure that Visual Micro
will not be flooded with messages. You can see that the board sends messages
continuously at your board's Receive/Send LEDs flashing.
However, for longer time periods, you can use the tracepoint's timestamp to
measure the time spent in an operation.
You can now continue with part 3 of the tutorial:
3. Text output for breakpoints