Normally users will want to configure an Arduino IDE(s) location because this makes the boards and libraries that are installed with the IDE (such as:- Uno, Mega, Servo Lib) available for development. If no Arduino IDE locations have been configured, an IDE option called "Visual Micro (No Ide)" will automatically be available for development. The Visual Micro option works the same as when an IDE is configured except that is only has access to downloaded and custom "Boards" and "Libraries".
After setting a new IDE location, ensure that your preferred IDE is selected on the "vMicro" menu.
Ensure the Arduino IDE Installed is the Desktop version, not the Windows App store Version.
Installation of Visual Micro
If you have not already installed the Visual Micro Extension in Visual Studio/Atmel Studio, please the installation guide.
First Time Setup of Visual Micro
The following page guides you through the first steps needed to set up
your development environment.
At the end of these steps, you will be ready to write, compile, debug, and
upload your Arduino sketches
1. Start your IDE
2. Setting up Visual Micro
If it is the first time after you have installed Arduino for Visual Micro,
the Configuration Manager will pop up wherever you can configure your system. Visual Micro
must know the version and installation path of the Arduino software that
you have installed previously, see the Getting Started page, step 1. This also applies to similar IDEs
like mpIDE or Energia.
The Configuration manager looks like this:
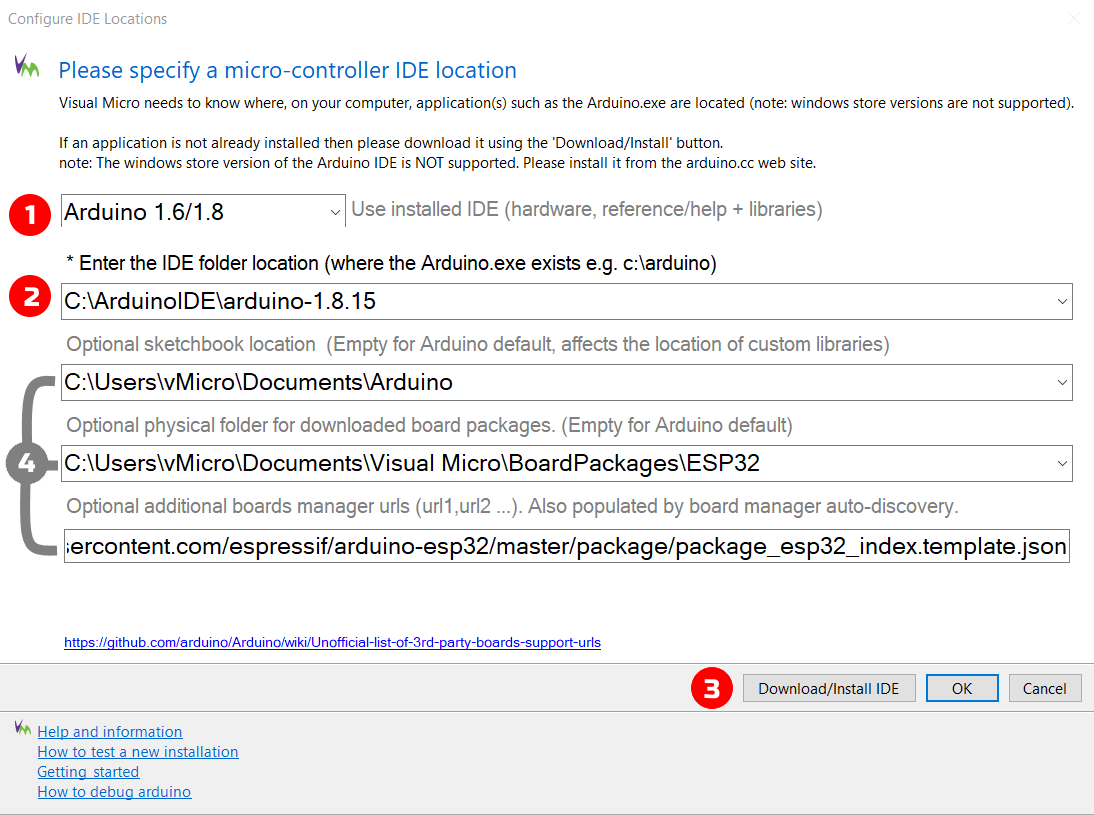
1
Specify the type and version of the original (Arduino) IDE you have installed
2
Specify the folder where this IDE is installed
3
If you have not installed the IDE yet, you can download and install it here
4
These are advanced features that are not needed for the initial setup
The sketchbook location specifies where Visual Micro will search for user
libraries. See "Adding Libraries to your Sketch".
It is recommended to leave this field blank, so that Visual Micro
uses the same sketchbook location as your original IDE (e. g. Arduino IDE).
In contrast to the original IDEs, the sketchbook location string is only
relevant for finding user libraries in Visual Micro. Sketches
(projects) themselves can be sored everywhere.
Done!
Now the initial setup of your system is done. You may now continue by
creating your first project or by opening an existing project. Learn more
on this page
This page describes a quick
test to see if everything is installed and set up correctly.
Support for Multiple Versions of the Arduino Software
If you work with different boards that required different
IDEs, or if you have multiple versions of the Arduino IDE installed, then
repeat the steps above for each IDE.
You can then switch between configurations with this toolbar control:
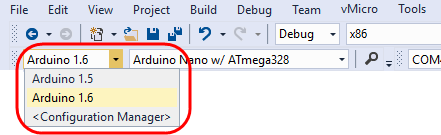
With multiple configurations installed,
Visual Micro will always support the boards that are contained in the
selected configuration.
Read more.
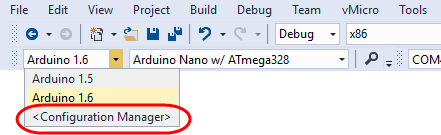
Modifying Existing Configurations
You can open the configuration manager at any time later by
clicking on "Configuration Manager" in the Visual Micro toolbar:
Updating/Completing an installation
Versions 1.6.2 or newer of the Arduino build tools can be managed and
updated directly from within Visual Micro. Read
more