news: april 2017 - this functionality is free and in all version from vs2015+
related: shared single code files between projects
Visual Micro makes special use of Visual Studio C++ Shared Projects for both project and library development. C++ shared projects were released in Visual Studio 2015 and are improved in the soon to be released Visual Studio 2017.
Use "File>New>Project>C++>Arduino Library Project" to create a new library project or the "Add Library" menu to create from existing library code. When creating a project from existing library code, the code remains unchanged and compatible with the Arduino IDE.
There are two types of shared projects that Visual Micro supports. It is important to understand the difference. Shared "library" projects that contain an Arduino format library.properties text file in the project root are compiled as Arduino Libraries. Shared "code" projects do not contain a library.properties text file. During compilation of shared code projects, the code is merged with the main project code in the temp build folder. In this case the code can be accessed as if it was within the folder structure of the main project.
Multiple main projects can use the same shared project(s). Intellisense in shared projects is powered by the current "Startup Project". A shared project can not be compiled directly, can not be a Startup Project and does not have a fixed platform.
tip: Adding a new library project to an official Arduino library folder will automatically make the library available for use in the Arduino IDE.
Shared projects can be created using the standard Visual Studio new project wizard.

Visual Micro also provides a simple way to create a shared project for an existing Arduino library.

Shared projects that contain an Arduino library.properties in the root folder are considered to be Arduino Libraries. If the library.properties file does not exist the shared project is considered part of the main project.
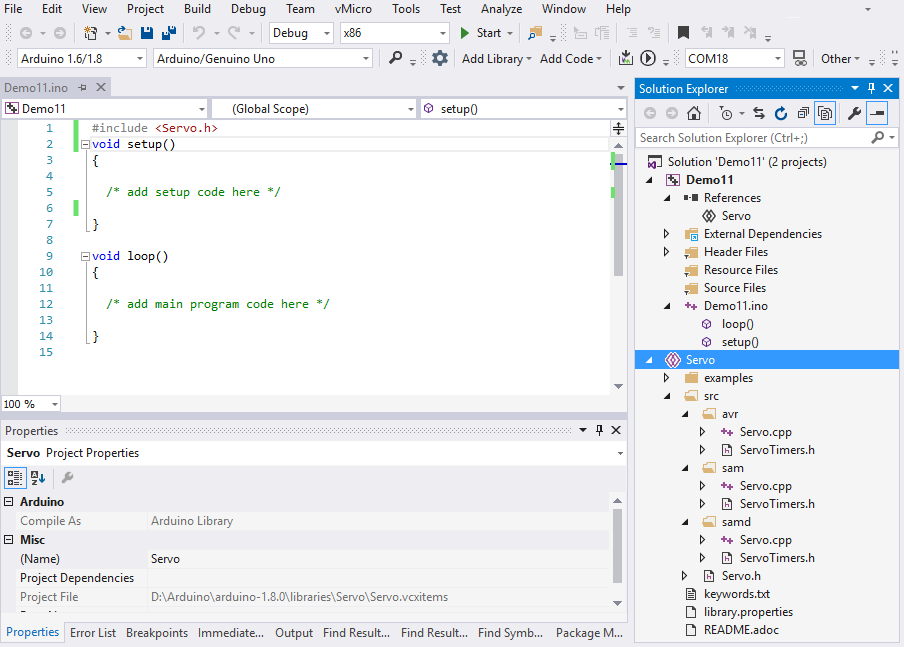
The "References" node of a Visual Studio project enables shared projects to be referenced by a master project.
Some of the magic of shared projects is that they do not have a specific architecture. Instead the architecture (intellisense etc) is taken from the "Startup project" of the current Visual Studio solution.
This enables us to develop cross-platform code whilst benefiting from intellisense for a specifc architecture. in fact VS2017RC takes this a step further but that's for another blog.
Using a shared library project is no different to using normal Arduino libraries. In fact they are normal arduino libraries except they also have a .vcxitems file in the library root which simply allows Visual Studio to show the source code during development (in a solution).
Shared library projects must be #included in the code in the same way as a normal Arduino library. The fact that we are using a shared project for development has no bearing on the compilation. The compliation works as normal and compiles the library as it does for all other libraries.
A useful difference between a shared library project and a normal library is that Visual Micro can find the library in any location, not just the published known Arduino library locations. This has many benefits for source control and also versioning.
It is possible to create a shared library project and add it to a solution with a single click.
All users must add a reference to the shared project to the master project(s). Right click the "References" node of a master project in the solution explorer to add the reference to the Shared Project (library). This ensure the intellisense of the shared project will know the correct architecture.
Below are the images of the steps for paid Visual Micro users:-
1) Paid users should switch on "Create a project when adding libraries
2) Add a library to a project in the usual manner.
If the project already uses the library it will not cause an issue. If the lib headers are not required in the .ino file you can remove them.

3) After adding a library, the headers will be inserted into the .ino code as usual. In addition, a new project (with the same name of the library) will be added to the currently open solution (if the library project does not already exists in the solution)
So that intellisense can detect the correct platform, a reference is added to all master projects in the solution that use the library.
Right click the References node of a master project and then click "Add Reference"

4) When the Add Reference window opens, cick the "Shared Projects" tab and put a check mark against the library project(s) you want to use in the current master project.
