Installation of Visual Micro for Arduino
The following section helps you in setting up your software environment for
Arduino development.
 Before starting off,
read here
how the various software tools work together.
First, you must install the IDE (development environment) that your
hardware vendor provides.

1. Install the Arduino Software
The Arduino software is the toolset most Arduino users start with.
You need the Arduino software because it provides the gcc toolset, the Arduino
software library, and an uploader that will later work in the background.
Supported versions of the Arduino software:
There are many changes from one version of the Arduino software to
another, so be sure to use a version that is already supported by
Visual Micro.
To find out which version of Arduino is supported by
Visual Micro, consult the
Release history page.
You can download the software from
www.arduino.cc/software
-
Download the Arduino software and install it by running
the Setup program.
1. Install the Software According to your Board
Manufacturer
Follow the instructions which the manufacturer of your board
provides.
For Arduino compatible boards in general, there are software packages
like "Energia", "mpIDE", or
"Teensyduino IDE" that
are more or less similar to the Arduino software.
-
Follow your board manufacturer's instructions and install the software
according to these instructions.
Installing an Arduino IDE has become optional since Visual Micro 1702.25 (25th Feb 2017).
After installation of Visual Micro, hardware and libraries can be installed using the Manage Boards and Manage Libraries tabs in the Visual Micro Explorer.
Alternatively, configuring Visual Micro to use an installed Arduino IDE provides access to built-in hardware (such as AVR and Teensy), help/references and libraries. (tip: In most cases the same hardware and libraries can be installed using Manage Boards without need for Visual Micro to find an installed Arduino IDE)
To configure Visual Micro to use an IDE click the 'Configure' button on the Visual Micro Explorer.
When locations for one or more Arduino IDE versions have been configured they will appear in the Micro Applications combo box on the tool bar and menu. The default micro-application name will show as "Visual Micro". Drop down the list and select a different application such as "Arduino 1.6/1.8". The choice will become the default in your global settings. Projects will remember the choice when made with a project open.
Ensure the Arduino IDE Installed is the Desktop version, not the Windows App store Version.
For certain newer boards, a minimum version of
the Arduino software is required. Please follow the instructions of the
board manufacturer or board specific instructions on the
Arduino website.
To be on the safe side, install the newest version of the IDE.
There are also boards that require a particular version number, like
the Intel Galileo.
Read the instructions of the board manufacturer.
Visual Micro always tries to support the newest versions of the Arduino software. In order to find out which version
of the Arduino software is supported, check the
Release History page.
1. Install either Microsoft Visual Studio or Atmel Studio
Visual Studio and Atmel Studio are
IDEs,
Integrated
Development
Environments, that offer a
powerful editor and integrated tools for compiling and uploading your code.
After installing one of these IDEs, we will later install
Visual Micro
as an extension module to these IDEs. The
Visual Micro extension
enables Visual Studio and Atmel Studio to compile and upload Arduino code, using
the original tools in the background that you have installed in step 1.
If you are not sure which IDE to choose, read this article:
Which is
the right IDE for me?
-
Download the IDE of your choice (Visual Studio or Atmel Studio
In case of Atmel Studio:
Start Atmel Studio once before you proceed.
This
performs some initial tasks with Atmel Studio that are required for a
successful installation of Visual Micro in the next step.
Supported Versions:
- Microsoft Visual Studio 2017 and higher
- Atmel Studio 7.0
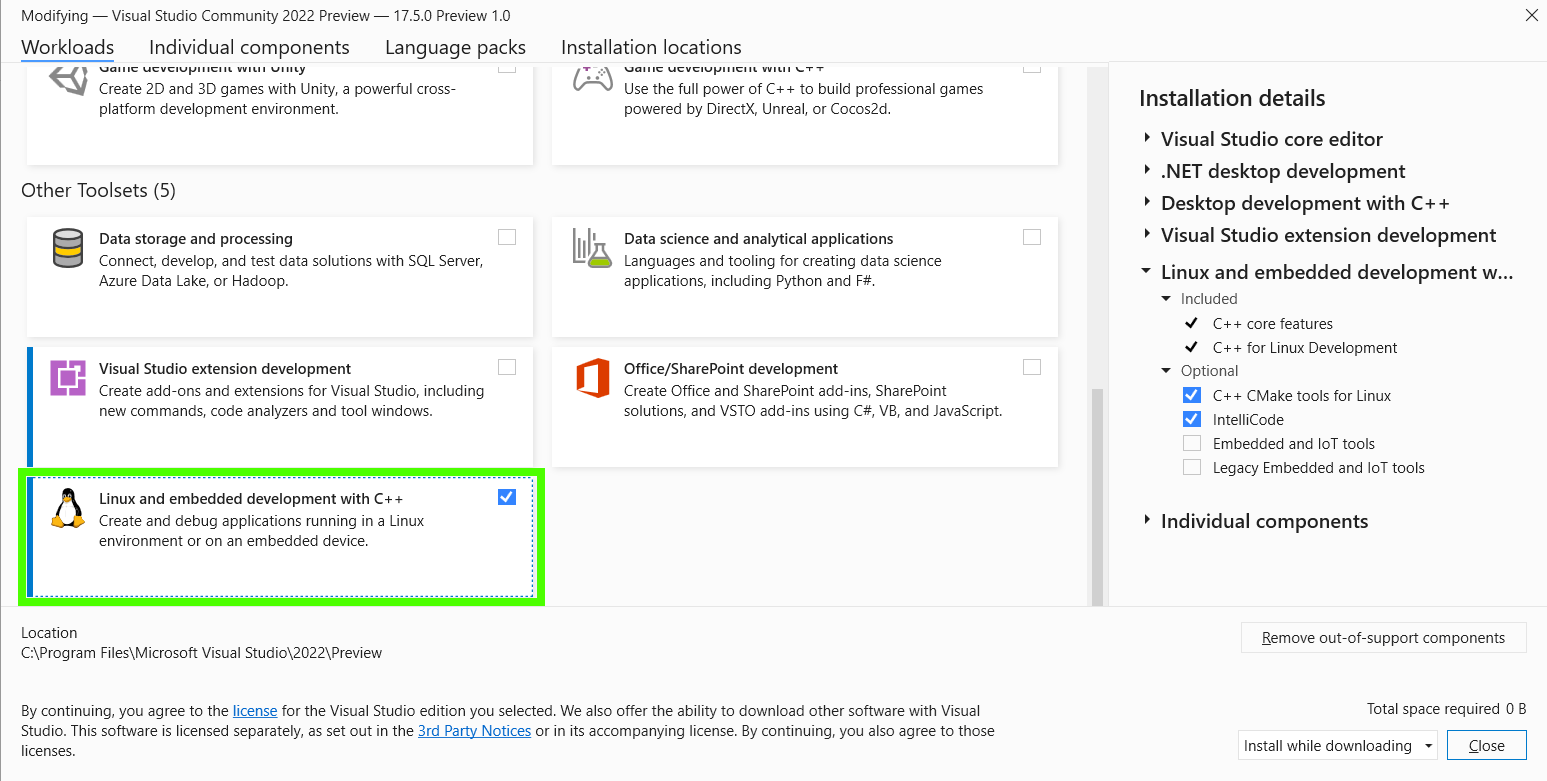
Workload Check
Ensure you have the "Linux and Embedded Development with C++" Workload selected for install in Visual Studio before installing Visual Micro to avoid potential issues.
This can be done as part of the setup process, and accessed from Tools > Get Tools and Features.

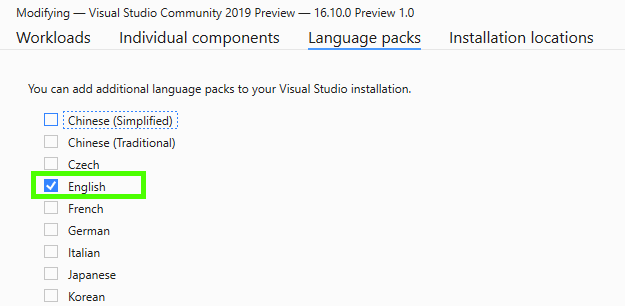
Language Check
Ensure you have the English language pack installed, to prevent potential issues with debugging and crashes.
This can be done as part of the setup process, and accessed from Tools > Get Tools and Features > Lanugages

Newer versions of these IDEs will be supported by Visual Micro
soon after they are released. Check the
Release History page for the newest information.
2. Install Visual Micro
Visual Micro is an extension to Visual Studio or Atmel
Studio.
- Download Visual Micro from
here
- If Visual Studio/Atmel Studio is running, then close it
- Install Visual Micro
by doubleclicking on the "vsix" icon of the downloaded file.
If you have multiple Visual Studio Versions Installed, and have installation problems, set the program to Open With the VS Version Selector as below:

Done!
Now you have successfully installed all required programs. Continue now on the
"Setup"
documentation page to set up your environment.
If you had any problems installing these programs, view the
forum to find helpful
information