Adding and Deleting Source Files
As your project becomes bigger, you should split it into individual
source files to keep a clear structure.
Having separate source files also reduces compilation time, at
least if you decide to use .CPP files instead of .INO files,
see later.
The resulting program will be identical, independent of having one or
multiple source files. It's just a matter of organization of your sources.
Adding a new source file
- In the menu, click Project > Add New Sketch Item:

You can choose between Arduino items, C Items
and Cpp items.
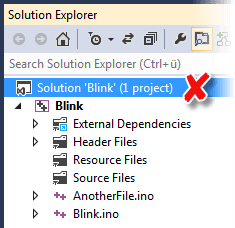
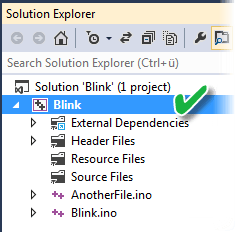
If the Add New Sketch Item menu item is
grayed out, then you most likely have selected the whole solution in the
Solution Explorer, instead of the project:
(Solutions are a collection of individual projects in Visual
Studio/Atmel Studio, but at this point, we don't need to know more about
them.)
If the Solution Explorer is not shown, make it visible by pressing
[Ctrl+Alt+L]
After clicking the menu item, a new and empty .INO, .C or a .CPP file are
added to your project. You will be prompted for a filename. Enter the
filename without the extension.
All three file types are used to write source code.
What is the difference between these file types?
- Arduino items = .INO files are the Arduino
standard. When compiling, Visual Micro treats all .INO files as they
were one file. That's why you don't have to deal with include files (.H
extension) as long as you are using .INO files only.
- .C items are used to write code that is written in
the C language. Unless you have special reasons, you should not use .C
files, because the C language has no obvious advantages over the
language Arduino uses normally and can cause compatibility issues..
- .CPP items are used to write code that is written
in the C++ language. This is the same language the .INO files use. Along
with the .CPP file, Visual studio also creates a matching .H file.
The
newly created .CPP file already contains a skeleton for a new class,
ready to be used. If that generated code does not fit your needs, simply
delete it.
File names...
- must not start with a number
- must not be longer than 30 characters
- must not contain any blanks
If any of these rules is broken, your sketch will not compile
correctly.
Read the Renaming Source Files and Projects
section to learn how to change file names
Which file type shall I use?
This article tells you
more about the difference between .INO files and .CPP files and helps you in
choosing the right file format.
Adding an existing source file
In accordance to the Arduino specification, a project consists of all
source files in the project folder on your hard drive, regardless
whether they appear in your Visual Studio/Atmel Studio Solution Explorer or
not. If you have a file in your hard drive's project folder that is missing
in the Solution Explorer, then you can add it with "Project > Add
Existing Item" in the menu, so that you can double click and edit
it.
With this method, you can not add files to your project which are
stored in a different folder on disk. However, you can add them to Solution
Explorer, but, according to the rule above, they will not be part of the
compilation because they are not in the project folder on disk.
Deleting files
If you want to remove a file from your project, click on it in the
solution explorer and press [Del]. If you do so, a box
appears that lets you choose between removal and deletion.
Removing a file only means that it won't appear in Solution
Explorer anymore, it is still part of your build. After reopening the
solution, such files will appear again. That's why it is not recommended to
use removal.
Deleting a file will remove it from the project and delete the
file on your hard drive as well.
If you want to be sure that the file will be excluded from compilation, but
you want to keep the file, then rename it's file extension in Windows
Explorer, e.g. from "myfile.cpp" to "myfile.__cpp" or move it to a different
folder.