April 2014: Please see our new documentation for a better install and first time user guide
existing user? recent fixes and additions
After installing Visual Micro you will be prompted to enter the location of an Ide, such as the Arduino 1.5.x Ide. This is all there is to setting up Visual Micro.
The Ide location(s) can be re-configured at anytime by clicking "tools>options>visual micro" or by clicking "<Configuration Manager>" in the tool bar applications list. Ide re-start is not required when changing these locations.
There is also a large number of optional configuration properties described in the wiki.
First Time User Guide
- Install the arduino software from arduino.cc
- Close all Ide's!!
- Install the Visual Micro software
- Run the Visual or Atmel Studio ide, you will be prompted to enter the location of the arduino ide
- tip: in the arduino location prompt there is a link to download Arduino if it is not already installed
- Register .ino (and .pde) files for color coding by following this article (not required for Atmel Studio versions)
- Got a problem with the install? Please join the forum we want to help. Thanks
How to set the Arduino ide location
With so many Arduino Ide variations it makes more sense to allow for multiple Ide apps to be support in a single Visual Studio or Atmel Studio instance. The "Application Manager" provides a simple tool to specify the locations of the various Arduino Ide's that are installed on your computer.
tip: The 1.0.x application can also be used for arduino versions older than 1.0
One way to set ide application locations is by using the "Application Ide Locations" property under "tools>options>visual micro" shown below

Another options is to use the <Configuration Manager> accessed via the Applications toolbar list

The remainer of this document explains a few basics and how to test your install, create or open and then compile and upload...
When testing a new installation of the Arduino IDE for Visual Studio, to avoid confusion, the Arduino/Sketch commands (such as file>new>sketch project) should be used in preference to standard visual studio commands.
If you are new to both Arduino and to Visual Studio then you MUST use the Arduino commands because you won't know the Arduino rules. You will see that the Arduino commands have an Arduino icon next to them.
The following are a few ways to test your Arduino for Visual Studio installation (similar to getting started guide)
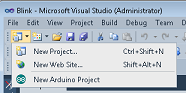
Method A - Create new arduino sketch (automatic mode)
Open visual studio. From the "File>New" menu select "Arduino project". When prompted, enter the name of a new arduino sketch such as "MyFirstSketch". Click OK
You should see a new arduino project is created containing an arduino sketch called MyFirstSketch.pde
Add your own arduino code to the void loop() {}
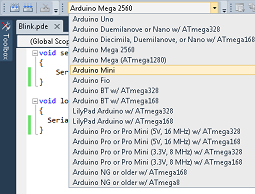
Select an arduino board from the list and click "Build Solution" from the "Project" menu
You should see a successful arduino compile in the "Sketch Build" output window

Tip: The same functionality is available from the Visual Studio "Standard" tool bar and also the "Solution Explorer" context menu
Method B - Open an existing sketch (automatic mode)
In visual studio select "File>Open" then click "Arduino Project". You will be presented with an "Open File" window which will display your arduino sketch folder. Select a sketch and click OK.
A project will be automatically created for the sketch and the arduino source codes automatically added to the project.
Add your own arduino code to the void loop() {}
Select an arduino board from the drop down list of boards and click "Build" solution from the "Project" menu
You should see a successful arduino compile in the "Sketch Build" output window
Method C - Open an existing sketch (semi automatic mode)
In Visual studio selected "File>Open>File". Navigate to an arduino sketch folder and select a .pde file. Click OK
You will be asked if you would like to Open or Create a project for the arduino sketch. Click OK.
Add your own arduino code to the void loop() {}
Select an arduino board from the drop down list of boards and click "Build" solution from the "Project" menu
You should see a successful arduino compile in the "Sketch Build" output window
Method D - Creation of a new arduino project (manual mode)
In Visual Studio create a new empty C++ project called "MySketch3" in a folder called "MySketch3"
Add a new text file to the project and call it "MySketch3.pde"
Add your own arduino code to the void loop() {}
Select an arduino board from the boards list
Select an arduino board from the drop down list of boards and click "Build" solution from the "Project" menu
You should see a successful arduino compile in the "Sketch Build" output window
This product is not "associated to" or "endorsed by" Arduino. The design of the sketch compiler and uploader is directly based on the arduino source code